The lockdown has meant spending a lot more time at home and as the sun has been shining I’ve spent the last few weeks experimenting more with wet cyanotype, lumens and anthotypes. So I thought I’d share some of the work I’ve created and a little bit about how each image is made. The chemicals can be purchased at most photographic suppliers and are inexpensive. As well as the chemicals, all you need to start creating your own wet cyanotype prints are, some paper, fabric or porous substrate, a brush, some vinegar and washing up liquid, a glass or perspex frame to expose your print in, gloves and somewhere to wash your exposed print.

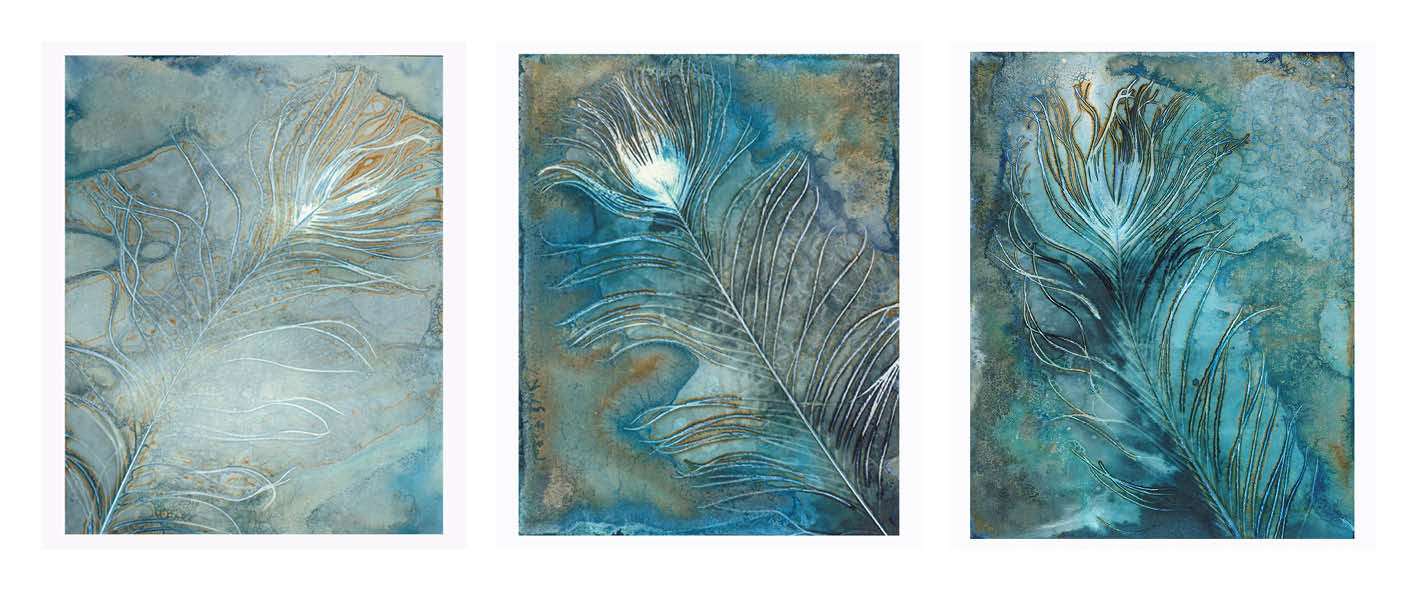
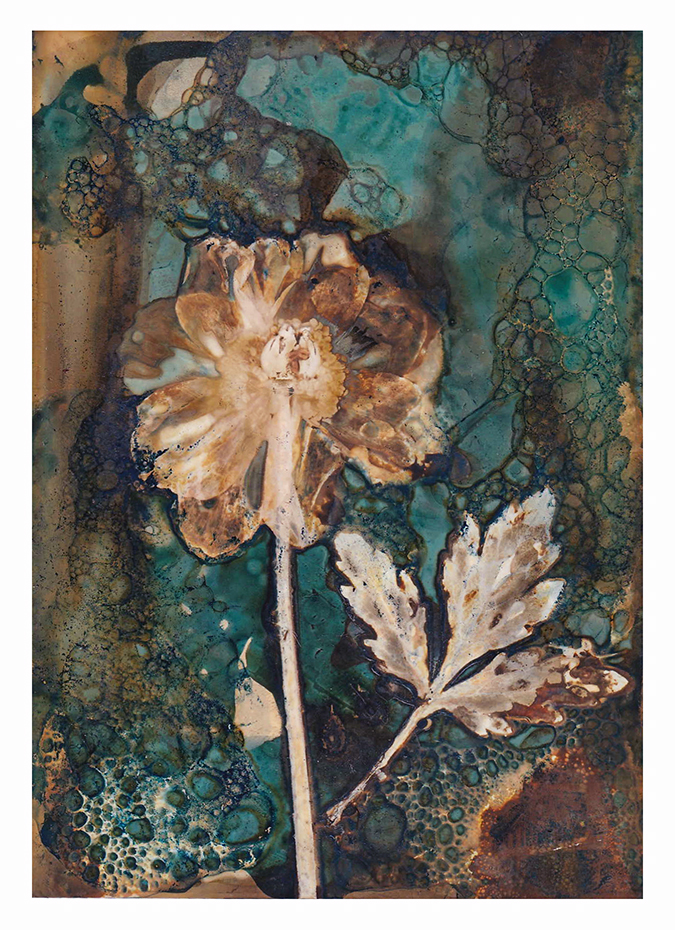
The dandelion image above was made by coating a 5″ x 8″ sheet of platinum rag paper with the mixed cyanotype chemicals (as per manufacturers instructions). I have applied the dandelion whilst the paper was still wet and laid on a sheet of glass, then I add bubbles (made by mixing washing up liquid in the sink) I have then smeared neat distilled vinegar on the glass that will cover the print as it develops and also dropped small amounts on to the print itself (as you can see in the upper left corner). I’ve then clipped the glass together (I have learned to tape the edges of the glass with gaffer tape to avoid any accidents) and left the print to develop in the sun for several hours.
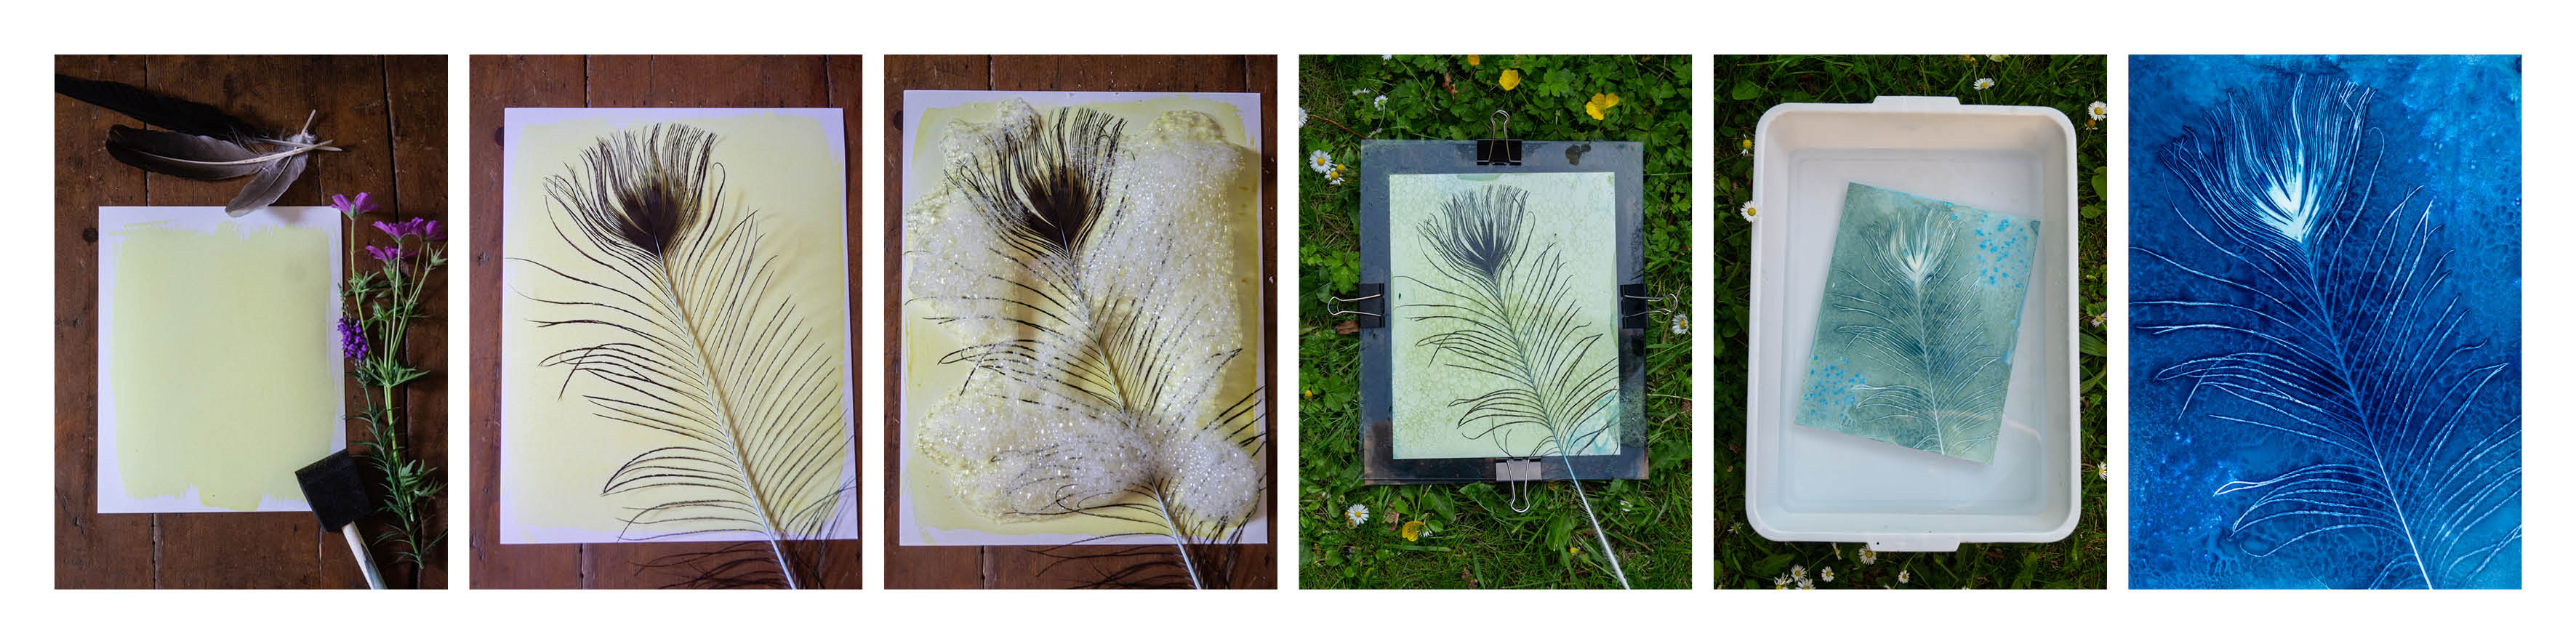
Generally wet cyanotype prints will need at least an hour, much longer than traditional prints, but the strength of the sun will mean these times can vary, usually I will leave them out for several hours, and occasionally for days. When the prints first go out, they will begin to change colour, then the colour will fade away completely (don’t panic) and over time it will reappear and intensify. The colours seem to develop most strongly in the first hour or two, but changes are still taking place after many hours, so if you have patience it pays off if you can leave the print for longer in the sun.
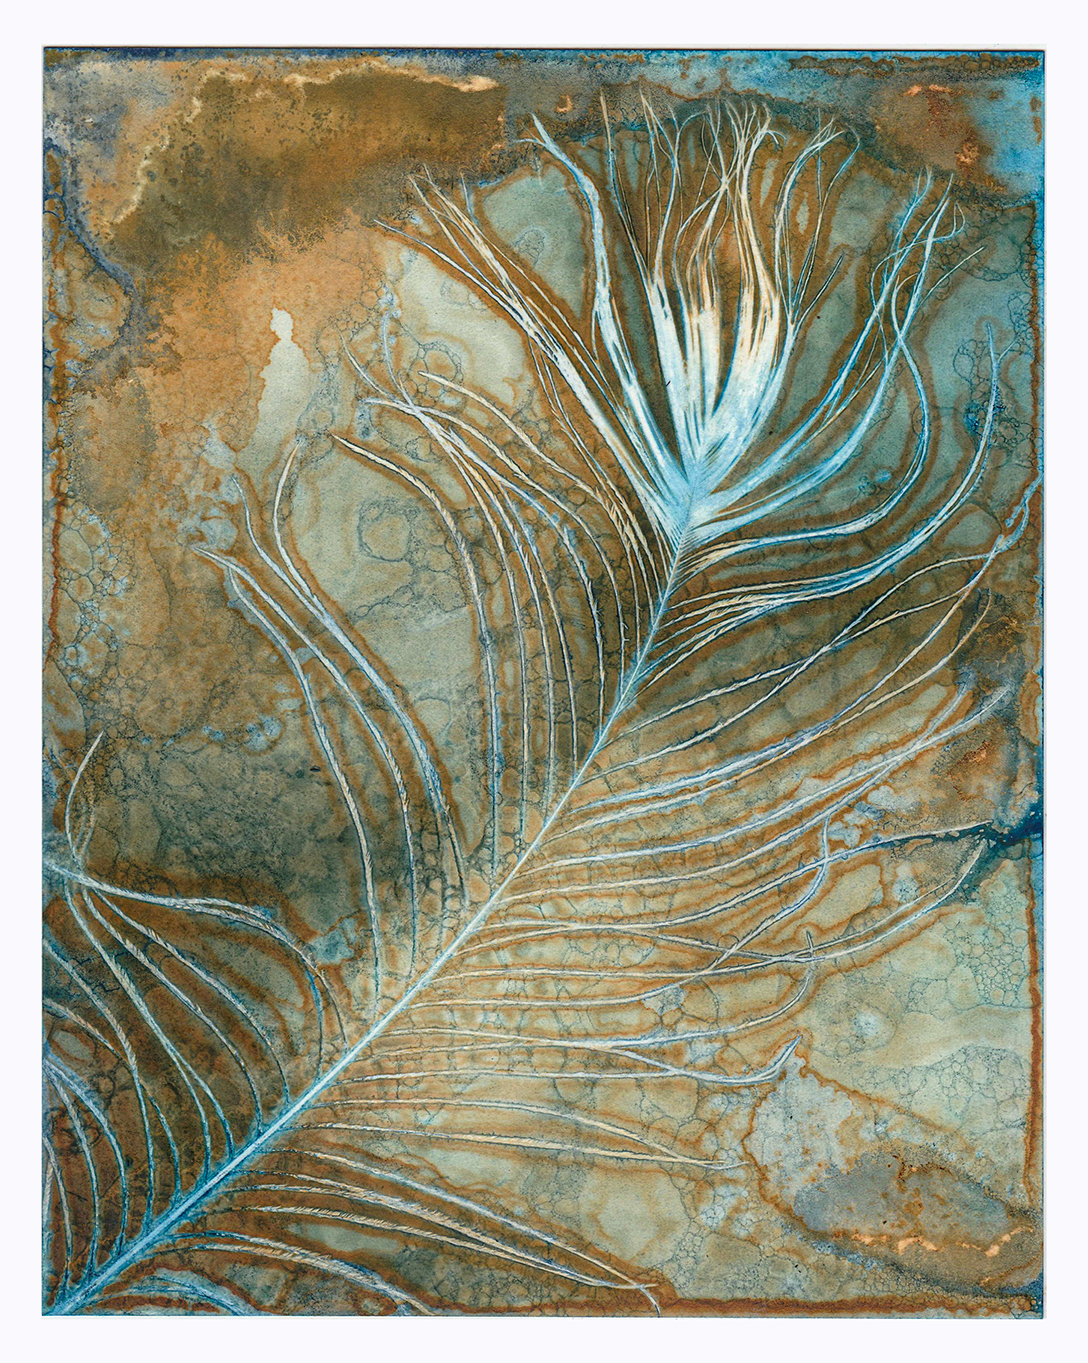
The orange tones in the feather print above are created using distilled vinegar, applied neat to the print whilst the chemicals are still wet on the paper, as in the dandelion print above. Here I have been a little more liberal with the vinegar. Oranges can also be obtained through the addition of turmeric, which can be applied as a powder or in solution, however I don’t tend to use it and prefer to just work with soap and vinegar. If I don’t have vinegar to hand then lemon or lime juice make a good alternative.
When the prints are ready, unclip the frames and wash them in water for 5 minutes to remove any residue and chemicals. They do not need to be fixed. The prints will change colour over time as they oxidise and deeper prussian blues will appear. This process can be hurried by immersing the print in a bath of diluted hydrogen peroxide. Prints can also be bleached, I use a solution of bicarbonate of soda, or toned in solutions such as tea or coffee to produce other colours and tones.
Beautiful and interesting effects can be achieved by wrapping the prints with cling film as they develop, but as an environmentalist I am keen not to use single use plastics, so don’t do this. I am trying to figure out a natural way of creating a similar effect. I’m aware I am already making art with chemicals and don’t want to further increase the footprint of my art. For this reason I have been working more frequently with anthotypes as they are completely natural using emulsions made with plants painted on to watercolour papers which are then exposed to the sun. This time you are working with a positive instead of a negative and these prints will take days to months to develop as the sun slowly fades the emulsion left exposed to the light. Do remember to take them in over night as unlike the wet cyanotype getting them wet can ruin the print, which is particularly heartbreaking if it has been out developing for some weeks.
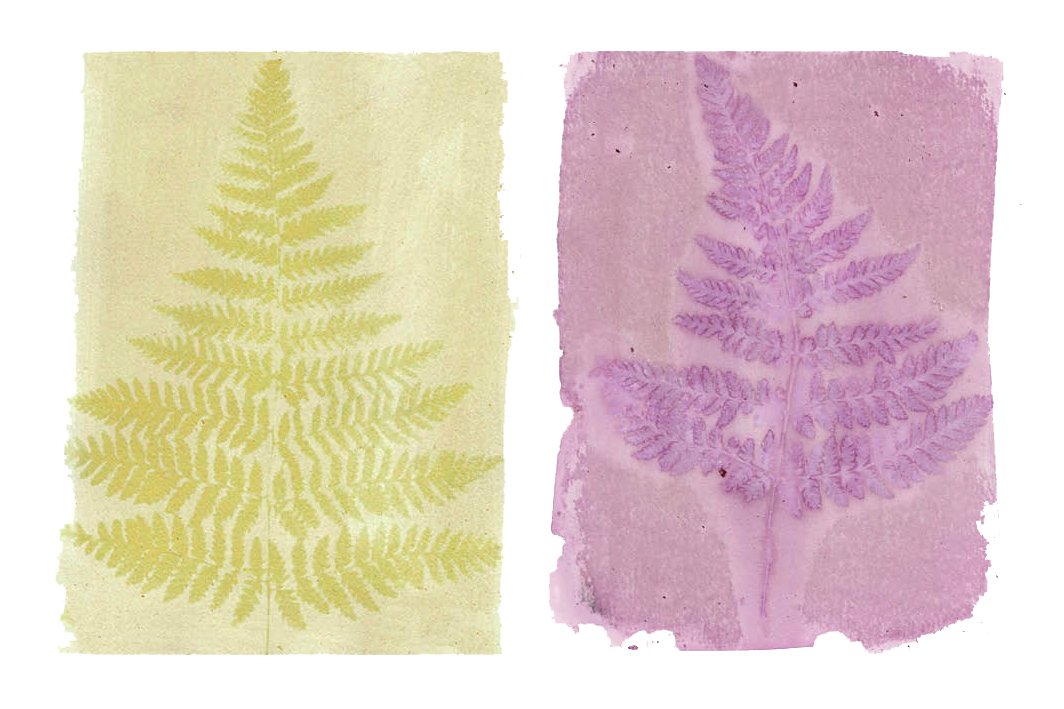
The prints produced with this method will not last indefinitely and I am drawn to that impermanence, delighting in seeing them fade over time. The emulsions are simple to make by grinding collected petals or leaves with a pestle and mortar (or whizzing in a blender) and adding distilled water or alcohol, the mixture can then be squeezed through a cheesecloth or sieve and painted on to your paper. Alternatively you may dip the paper into the emulsion. Each method will produce an artistically different base layer upon which you can develop your print.
It is important to bear in mind that whilst natural, some plants can provoke reactions in some people so it is best to take care and wear protective gloves if you have sensitive skin or allergies.
The print above was produced by applying cyanotype chemicals to expired photographic paper, this process is enormously satisfying. The patterns that appear as you paint the emulsion onto the paper are so exquisite as the chemicals react instantly with the paper. In ths case I have then applied a flower, soap and drops of neat vinegar and clipped this in a frame and exposed the print to the sun for several hours. Salt makes very pleasing marks on the papers as the prints develop as can be seen in some of the prints below. And the addition of turmeric, paprika and coffee grounds can add other tones and textures to the final print.
To finish the cyanolumen prints I wash them in cold water for a few minutes and then put them in a bath of dilute Sodium Thiosulphate to fix them.
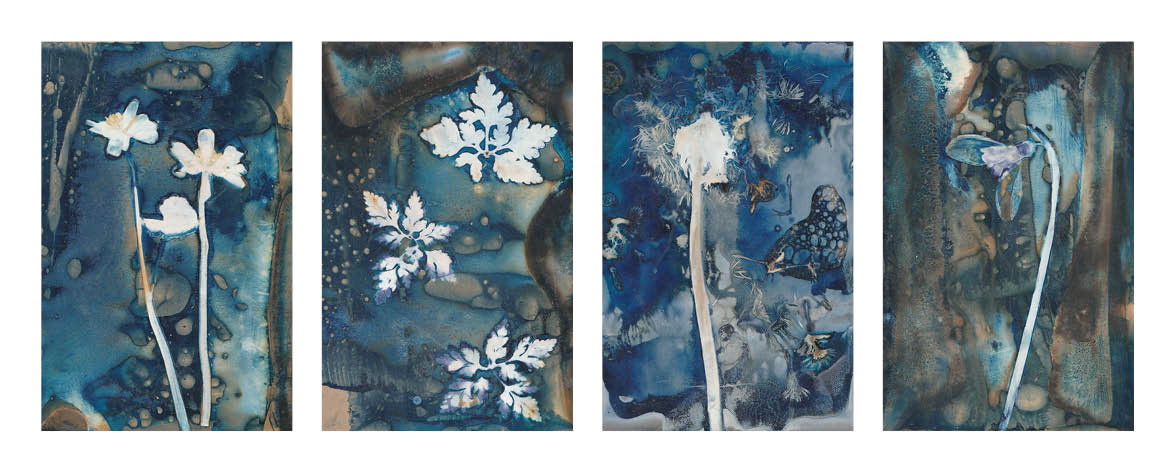
This week I have been creating cyanotypes on leaves. The images below show wet cyanotypes of mustard and geranium leaves on sycamore and london plane leaves I pressed last autumn. These have been created by applying the smaller leaves whilst the chemicals were still wet, this creates the dark blue tracing around the edges of the smaller leaves. I am excited about continuing this series and seeing where it takes me.

Last year I created wet cyanotypes of botanical subjects inbroken egg shells, these I then guilded with gold leaf. It is best to use egg shell fresh as the membrane inside the shell needs to be removed before the chemicals can be applied, and this becomes more challenging as the egg shell dries. The shells then become even more fragile to work with without the membrane holding them together, but I think the results are worth the effort.

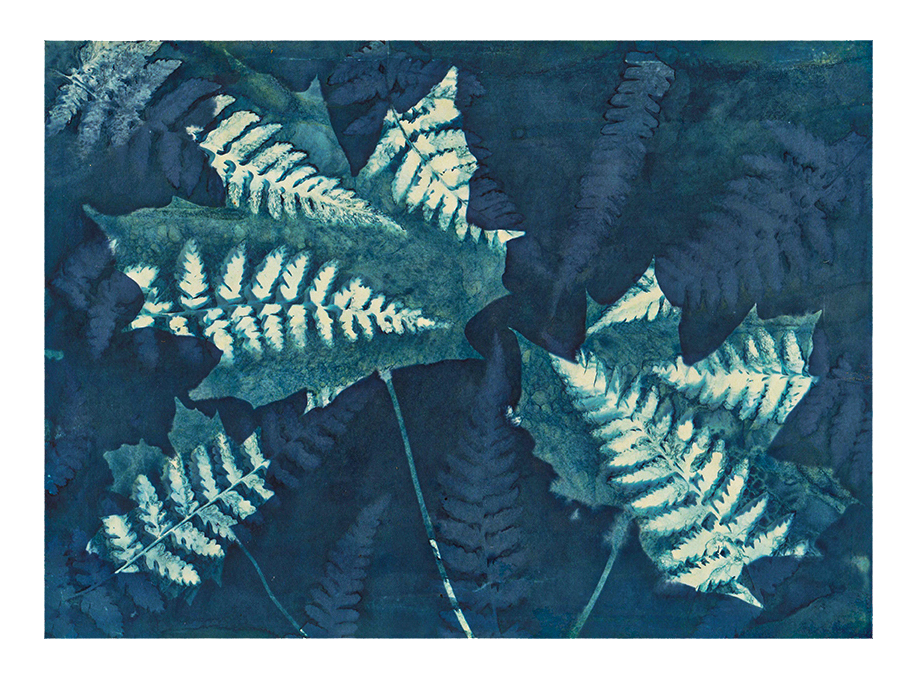
If you don’t like the print you’ve just created, don’t give up! Recycle. I made the print below by re-coating a print of ferns that really hadn’t worked with cyanotype chemicals, letting it dry completely and then applying the maple leaves and putting the print out in the sun for a further 15 mins to develop. This has created an interesting double exposure effect.
The cyanotype process is really accessible, the chemicals are inexpensive, and you can use newspapers and old book pages or fabrics such as cotton and calico if you don’t have paper at home. It has provided me with a serendipitous and experimental, creative outlet during the lockdown on days when I wish I could go further afield with my camera and am feeling frustrated or low. I hope if you are reading this that you might have a go at it too, and maybe share some of your creations with me as I’d love to see them.

You can see more of my cameraless work on the galleries on this site, including more information about how I produce my cameraless work.
Suppliers below are a few of the suppliers of cyanotype chemicals that I have used and can recommend, clicking on the links will open their sites in a new tab.
Health and Safety – it’s important to follow the manufacturers instructions when mixing and applying wet chemicals. Gloves, eye protection and a mask should be worn where there is the risk of inhaling or spilling chemicals. Cyanotype chemicals also stain, so unless you are looking to get creative with you wardrobe too, wear an apron to protect your clothing and be aware of the environment you are working in.
If you’ve enjoyed this post and would like to support my work you could buy a greetings card if you would like for less than the price of a cup of your favourite coffee at Love from the Artist.

These are beautiful images Jo. I love your creativity with the anthocytes and leaves on leaves.
I tried cyanotypes last year and they are very satisfying especially as the creator has very little control over the final appearance – a real antidote to some of the over processed conventional photographic images we see.
I am envious of your soap bubbles, as I found that when I put the glass on top and clamped it all together the bubbles popped. You have inspited me to have another go!
LikeLiked by 1 person
Thanks so much, Mary, I’m so delighted that you’ll be having another go! I find the bubbles work best if you clamp the print between two pieces of glass or perspex. When using a board as under the print I find there can be gaps and the bubbles will disappear. I hope maybe that helps?
LikeLike
Hi Jo,many thanks for the tip about the soap bubbles. I have just tried it between 2 pieces of glass as you suggested, rather than glass and board and it works! Keep safe and well and keep delighting us with your amazing images.
LikeLike
Hi Mary, I’m so glad you’ve kept your bubbles, that’s great. Do make sure you tape the egdes of the glass though as they are prone to cracking on occasion. Thank you and you keep sfae and well too. Cheers, Jo. PS. I don’t know if you can share images in comments, but I’d love to see some if you ever wanted to share. 🙂
LikeLike
Excellent, thank you very much Jo. I’ve been thinking of having a go with this for awhile now and at last a simple and easy to follow guide. Much appreciated.
LikeLiked by 1 person
You are very welcome, Lynda, thanks for visiting my site and reading my post. I hope the guide helps and do feel free to ask any questions or share your results. Have fun!
LikeLike
Thank you so much Jo. Your explanation is very clear and helpful. Can’t wait to have another go now using your techniques
LikeLiked by 1 person
You’re very welcome, Sue, thank you.
LikeLike
Gorgeous! I remember creating basic cyanotypes from a kit when I was a kid, but yours are breathtaking! I love the look of the vinegar oranges and the rippled/bubble effects around the forms.
LikeLiked by 1 person
Thanks so much, Erin, that’s so kind, I hope you’ll have a go and maybe discover even more interesting and surprising colours and shapes the chemistry and techniques create.
LikeLike
Thanks for an excellent post Jo and for sharing details of your methods. I am still learning so it is very useful to hear what other people are doing. Between yourself, Jill Welham and Glenys Garnett I am slowly getting there! You can see some of my efforts on my instagram at @alanobrien365. Best wishes, Alan.
LikeLiked by 1 person
Thank you, Alan, that’s vey kind and you are most welcome. I will mke sure to visit your page when I am next on Instagram.
LikeLiked by 1 person
Amazing work.
LikeLiked by 1 person
Thank you
LikeLike
Your work is wonderful!,,,,! I am very inspired by it
LikeLiked by 1 person
Thanks so much, Gloria, I really appreciate that.
LikeLike
Thank you so much!
LikeLiked by 1 person
You’re very welcome! Thank you.
LikeLike
Jo, I’ve just spent a fascinating half hour reading your guide to cyanotype making. I’m a seaweed artist, which involves pressing seaweed however I’ve been very keen to experiment with cyanotype and your blog has just given me the confidence to give it a go. Your work is stunning and I’d love to experiment with seaweed Cyanotype. I’ll let you know how it goes!!
LikeLiked by 1 person
Thank you so much, I am delighted my posts may have helped encourage you to experiment. I would love to see what you create!
LikeLike
Hey there, Thank you for the article. I am trying to find much more content similar to this. Kindly keep modernizing
LikeLike
Hello there. I am a late arrival at the party, and would like to say thank you for your generosity in sharing your methods. Your work is wonderful. I had known about cyanotypes, but was looking for something more interesting that the basic blue and white. You have inspired me. As a photographer in a previous lifetime, pre digital, I used to love developing and printing in my darkroom, (AKA the spare bedroom). I’m sure I must have some out of date paper somewhere, but who knows where? Do you happen to know of a source of expired paper, as this option looks very interesting. Thank you very much anyway, for showing us your work. Very best wishes to you.
LikeLiked by 1 person
Thanks, Lynsey, eBay is a terrific source for expired papers, and it’s always worth a rummage in local charity shops. You can also produce cyanolumen on new papers if you can’t find any older paper. Wishing you all the best!
LikeLike
Hi Jo – love your work and thank you for the generosity you’ve shown by sharing your processes… I’ve just discovered your work. I have a question on your Cyanotype process – what do you print your digital negative images on? I’ve tried the process using photoshop/invert b&w/ add high contrast and print on acetate but they haven’t worked out very well. If you’ve any guidance, I’d appreciate it. Many thanks Jane
LikeLike
A message for Jane, theres a link here to download a curve you can add to your images to get a good digital negative 🙂 Also if you add an orange fill before printing it helps bring your midtones out a little more!
https://www.alternativephotography.com/curve-corner-photoshop-curves/
LikeLike
Beautiful and inspiring work. Thanks for sharing.
I also have bubble envy…
Could you clarify which soap you use? I have tried many and find they all pop when put between glass. I’ve used lots and I’ve used little amounts, doesn’t seem to matter. Today I tried adding a piece of glass above the composition. They didn’t pop but they also left no marks.
I often hear the term (washing up liquid) is that just soap? Also, Is there a difference between dishwashing soap and bar soap? I have only used dish soap thus far.
Any help would be greatly appreciated.
Betsy
LikeLike